Showing posts with label How to. Show all posts

Tuesday, August 19, 2014

Book Carving

Recently I've been seeing some really cool book carving art on the Internet, and decided I would try my hand at it. Unfortunately, the experts online weren't spilling any secrets on HOW they made their works of art (seriously, just Google "book carving" and be amazed), so I had to come up with my own method.

First, I selected five victims *cough cough* VOLUMES from an old incomplete encyclopedia set we had lying around.


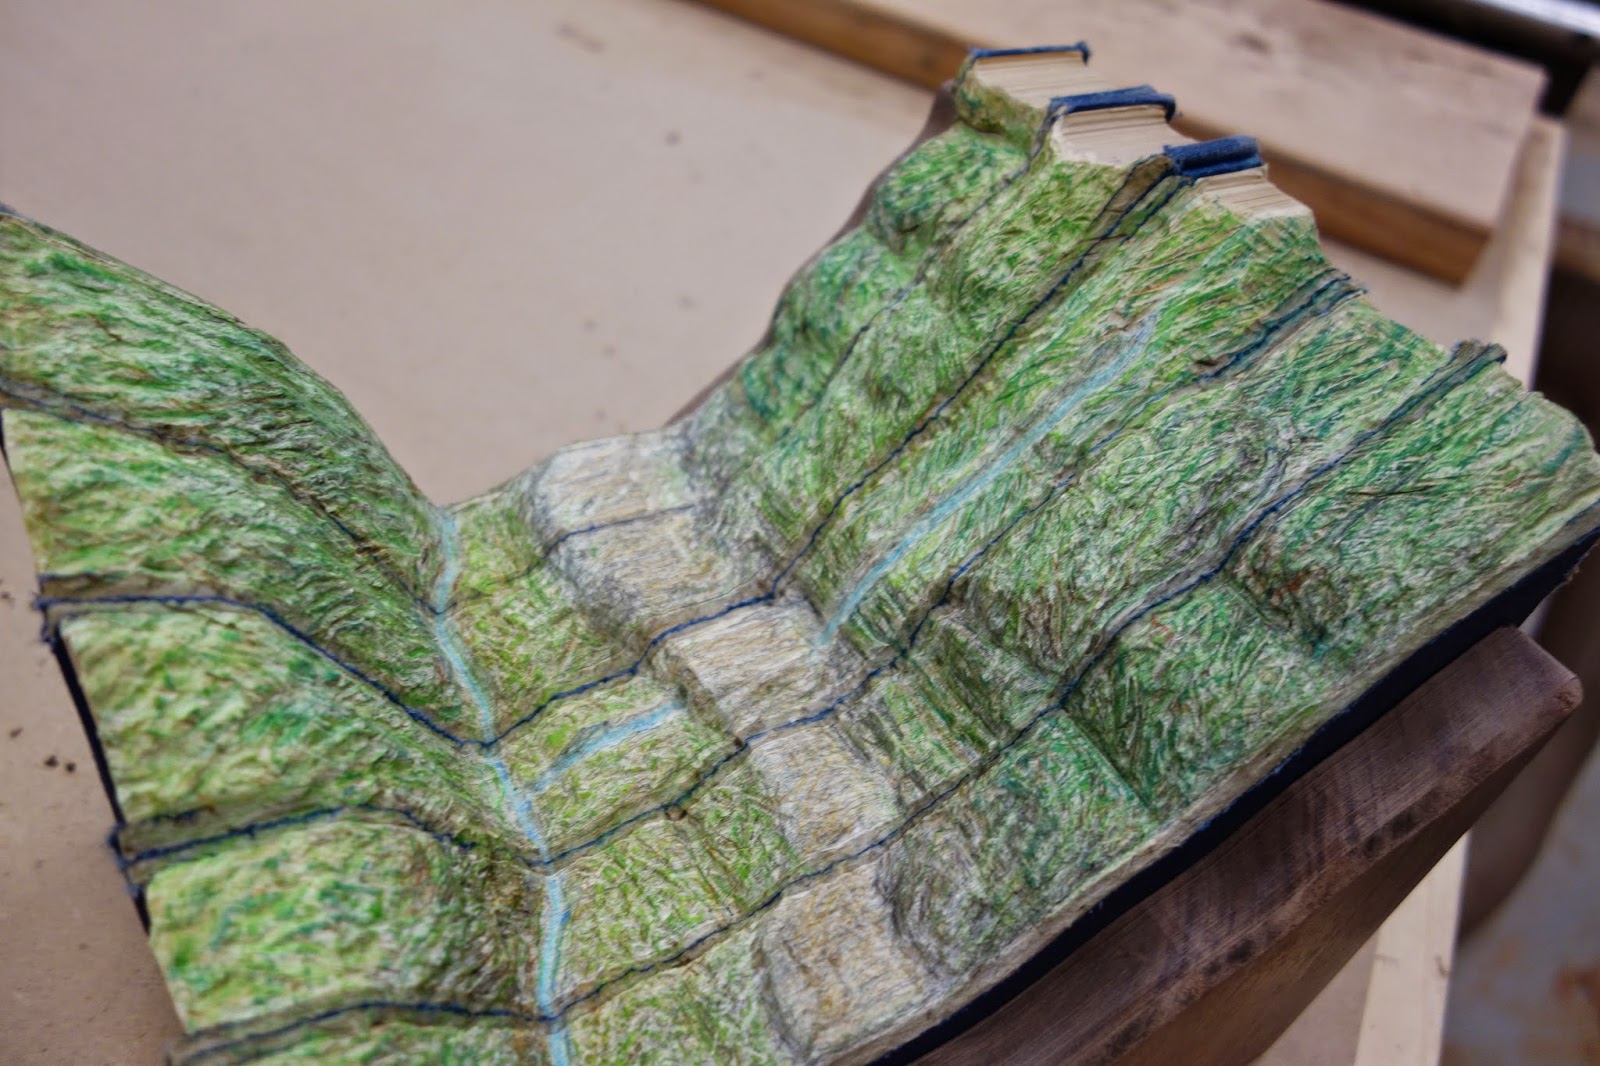
I then sort of designed in my head what I wanted the landscape to look like (valley with a path and a river). I then sketched out in pencil on the book covers what I wanted to cut out on each volume, and numbered them. I also made sure to number them on the inside cover, down by the spine where it wouldn't get cut out.


From there I cut out the negative space on a band saw. I couldn't cut the curves or change angles too drastically, so I cut it out in triangle-shaped bits and shallow slices.


Before cutting the books I had selected, I grabbed five OTHER books, traced the contours from the other volumes, and rough-cut the sample books on the band saw. Then I arranged those and noted which cuts and angles I would need to alter for the actual books.


After cutting the actual volumes, I set them up in a clamp on the bottom and also along the top to keep the books nice and closed and tight.


I then set about the actual carving by using a dremel. I tried several different bits on a space piece of wood first, and finally settled on a spherical bit with blades that looked like a star from the top. That seemed to take off the most book/wood at once. 


This process, the actual shaping of the landscape, was the most time-consuming, and took about 7 hours on and off. The most important thing was that the edges of the books lined up (one book couldn't be taller than another, they all had to flow together). I did the left hills first, carving them down until they were flush, and also giving them a very rugged appearance.


The second day I roughed out the trail that would go through the middle, the river that would come down the third volume, and the hills on the right.


Once I was done smoothing all the books together, it looked like this:


Next I wanted to give some texture to my rugged landscape, so I took a flat circular bit and etched some scratch-like marks into the hills. I also took a drill bit and deepened the ravine where the river would be coming down the hills on the right, flowing underneath the path, and joining the river at the bottom of the hills.


Once I was happy with the way it looked, I set about coloring it. I wanted to avoid water- or oil-based paints (in case they wrinkled the pages or stuck them together), so I experimented on my spare books with several types of media. I ended up using pastels and colored pencil.


And that was all there was to it! 


Friday, August 15, 2014

Hobbit Day (Year 2)

Following the success of Hobbit Day last year, my family and I decided to do Hobbit Day again this year. That means 7 meals during the day, each one with Hobbit-ish food. The meals were smaller than regular meals, and were all made by me.

7:30 am : First Breakfast: cinnamon bread, green peppers, tomato(es), doughnut halves, water, and juice
9:00 am : Second Breakfast : seed cake, crackers, cheese spread/spray, whipped cream, fruit, water
11:00 am : Elevensies : nut mix, crackers, cut cheese, cucumbers, cookies, dinner rolls, water
1:00 pm : Luncheon : pasta salad, nut mix, ham/turkey sandwiches, juice
4:00 pm : Afternoon Tea : tea, root beer floats, cinnamon bread, seed cake, cookies
6:00 pm : Dinner : pie and shakes
8:00 pm : Supper : pasta salad, dinner rolls, ham/turkey wraps, water

In greater detail:

First Breakfast
Originally we were slated to have toast and jam, but a last-minute doughnut purchase replaced the toast. The green peppers and tomato were left over from the pasta salad. The cinnamon bread was store-bought for convenience.


Second Breakfast
More of a fruit-based meal, second breakfast featured strawberries, grapes, and bananas, to be eaten with whipped cream. We used the spread cheese we had on hand to compliment the crackers. The seed cake was made using the traditional recipe here, and turned out very well.


Elevensies
We had more crackers for elevensies, though this time they were joined by cucumber slices and several types of cut cheese. We also had a nut-M&M-raisin trail mix, lightly buttered dinner rolls, and sugar cookies. 


Luncheon
For the main course, I made two sandwiches (one ham and one turkey, both with lettuce, pickles, cheese, and a tad bit of butter) and cut them into quarters. Again we had nut trail mix. We also had a large bowl of pasta salad made using the recipe here. I used rotini pasta, provolone cheese, pepperoni, cherry tomato halves/quarters, green peppers, and zesty Italian dressing.


Afternoon Tea
Since we had a surplus of root beer on our hands, we decided to forgo the tea and instead have root beer floats. Another option for the wintry months would have been hot chocolate. We ate some more seed cake, cinnamon bread, and sugar cookies.


Dinner
Dinner was planned to be BBQ beef sandwiches with dinner rolls and possibly some potatoes. The day before, however, it was decided that we instead go to a local county fair, so we ended up having pieces of pie and shakes.

Supper
Our last meal for the day, supper consisted of sliced wraps (ham/turkey, cheese, and pickles), lightly buttered dinner rolls, and more pasta salad.


The first time around, we overate at the early meals, making us terribly full by the time dinner and supper rolled around. This time, though, armed with that knowledge, we took the meals more as snacks, and I was perfectly alright until halfway through supper, when I think the other six meals caught up to me.

Friday, November 23, 2012

How To Make a Caramel-Filled Chocolate TARDIS

For the 49th Anniversary of "Doctor Who", I made myself a caramel-filled chocolate TARDIS. Here's how I did it. First off you'll need a mold. I already had one that I'd made the previous year, but here's the gist of it: Choose the design of your TARDIS, and lay it out on the computer in layers inversely, print it off, trace the shapes on cardboard, and cut them out. My TARDIS's about 10 or 11 inches high. The mold itself will take several days' time to do, and cutting cardboard is not pretty. At any rate, glue it all together and you should get something like this:

I made a chocolate TARDIS last year for my sister for Christmas, so I'd already made my mold. One of the problems I'd had last year was getting the hardened chocolate out of the mold. On closer inspection, the vertical edges of the mold were ) shaped, which caused the chocolate to crack and resist leaving the mold. To try to fix this, I cut and taped pieces of paper down and around, so that I could smooth out the edges without permanently altering my mold. 


Last year I'd lined the mold with plastic wrap; the plastic tore easily and wanted to hug the chocolate more than the mold. This time I used press-n-seal plastic wrap/cling wrap. With the slightly sticky side down, it stayed in the mold where I wanted it.


I used a bone folder (tool pictured below) to work the plastic into the edges and corners, trying to smooth out the wrinkles as best I could, and hoping that any that showed up in the final chocolate would simply look like wood grain. Fingernails or the smooth edge of a plastic ruler or such would substitute well for the bone folder.


For the chocolate I used 14 oz. of Hersey's chocolate, or the equivalent of two giant Hersey's bars. For the caramel I was initially going to use hard caramel squares; however, this proved problematic (more on that later). Instead I used ice cream topping. We didn't have any caramel on hand at the time, since it was a short-notice change, so I used butterscotch instead.


I melted the chocolate in the microwave, then used a carefully cleaned paint brush to paint the entire mold with melted chocolate. Make sure this layer is thick and you can't see the mold through it.


Freeze it.


This is what happens when you use hard caramels. After microwaving it to a burned liquid, it hardened rapidly and then turned into a nasty rock, not suitable for pouring or putting in a chocolate bar.


Take the ice cream topper caramel and squirt it into a square in the center of the TARDIS, however much you want in it. Freezing it won't cause the liquid caramel to solidify, so melt the rest of your chocolate and pour it over, bringing the chocolate up to the edge of the mold and smoothing it out. Freeze.


Now it's time to prize the chocolate from the mold. This is tricky, and you need to make sure the chocolate is fully frozen first. I got mine out with a combination of banging, shouting, and prying. I pulled the paper out from the edges of the mold to give the chocolate more wiggle room to work out. The light snapped off the top of mine, and then it cracked horizontally. :-( If you want to, you can melt a bit more chocolate and try to "glue" the pieces back together, or melt some white chocolate and do detail work: write "Police Box" on the top, shade in the light, etc. 


It's not the best TARDIS in the world, and a bit battered-looking (the time vortex is a hostile place), but it's full of caramelly goodness. The mold lived to make TARDISes another day!


Wednesday, August 22, 2012

Hobbit Meal Plan

So yesterday we decided to do our day eating like a hobbit; that is to say, 7 meals. I tried to keep portions as small as possible, and stick with hobbit-y food, though I didn't restrict myself to what I remembered reading in the Lord of the Rings five years ago. I cooked everything, for four of us total, and almost everything I set out was eaten.

7am  : First Breakfast
               toast, jam, tea, juice
9am  : Second Breakfast
               strawberries, grapes, whipped cream, seedcakes, bananas, cheese & crackers, water
11am  : Elevensies
               dried tropical fruit mix, dinner rolls, cheese & crackers, juice
1pm  : Luncheon
               salad, ham sandwiches, juice
4pm  : Afternoon Tea
               tea, cookies, seedcakes
6pm  : Dinner
               chicken, fried potatoes, dinner rolls, juice
8pm  : Supper
               ham rolls, cookies, dinner rolls, juice

In greater detail:

Toast and jam, the juice was apple raspberry. Also, we were going to make some bacon as well, but found we had run out!


Sliced strawberries and two types of grapes; sliced bananas, spread cheese, crackers, cool whip (for the berries). The seedcake I made the day before using using the recipe here. We didn't have any caraway seeds, however, so we substituted cumin seeds. Personally I didn't like the taste, it was a little strong, but my mom did, so it might be a matter of preference. I sprinkled some cinnamon on my slices to offset the taste.


Tropical dried fruit mix (it was on hand, not very Hobbit-ish, I know), crackers, cheese spread, slices of cheese, and dinner rolls with butter on them I put in the warming drawer to melt it.


Salad: iceberg lettuce, most of a head; about 1/3 of a bottle of Zesty Italian dressing, parmesan cheese, a sprinkle of walnuts, and crutons (we were out, so I cut up some toast instead)
Sandwiches: 2 sandwiches cut into squares : 1 slice of ham each, cheese, pickles, lightly buttered bread, head together with toothpicks


Leftover seedcake (we still had 1/3 of a loaf left over at the end), cookies (these are storebought ones we had on hand, but feel free to make your own!), tea and/or hot chocolate


Chicken is lightly seasoned (lemon pepper) chicken breasts (2), grilled. Potatoes: Boiled ones left over from the night before, sliced and fried over the stove with 1 or 2 tablespoons of butter, flip until golden brown. Dinner rolls.


Dinner rolls, cookie assortment. Ham rolls: 2 sliced into pieces and held together with toothpicks: taco shell, lightly buttered, 1 layer of ham, sliced pickles, sliced cheese, rolled up and sliced. The shell deteriorated a little when it became soggy with pickle juice; perhaps 2 shells on top of each other would be better. 

The morning was the easiest to prepare and eat, but by dinner we were all getting rather full and tired of eating! I almost missed supper because I was distracted and was totally done with eating. I can't imagine those poor hobbits eating meals any larger than these!
Overall a very fun and exciting experience, I would encourage you to try it out sometime!